Development
This SOP covers the Cannlytics architecture and how to build, develop, and publish the Cannlytics platform. You can view the platform live at https://cannlytics.com and read the documentation at https://docs.cannlytics.com.
- Introduction
- Installation
- Architecture
- Development
- Authentication
- Running the project for development
- Data
- File Storage
- Views
- Templates
- Style
- Text
- Building and running the project with Docker
- Testing
- Publishing
- Conclusion
- Resources
Introduction
The cannlytics package is the core module implementing cannabis analytics logic. The cannlytics module handles database interactions, file management, authentication and authorization, traceability, data importing and exporting, and the logic for all workflows, such as certificate creation, item transfers, and publishing results. The api is the interface between the user application and the cannabis analytics logic of cannlytics. The console is the user application where user's can interface with the infrastructure, such as the database, and utilize the cannabis analytics logic. The docs provide information about the project and the website provides people with information about cannabis analytics. You can test the app, console, and data UI.
Installation
In brief, installing Cannlytics entails:
- Cloning the repository.
- Setting your Firebase account credentials.
- Installing project dependencies and development tools.
1. Cloning the repository
The best place to begin is to clone the repository and get a lay of the architecture.
git clone https://github.com/cannlytics/cannlytics.git
2. Setting your account credentials
When you are ready to begin development or publish the Cannlytics web app, then you will need to setup your credentials. You will need to create a Firebase account and start a project before you begin. We recommend choosing a project name that is in kebab-case so that you can safely use the project name for many namespaces throughout the project, for example your-lims.
2.1. First, create an .env file at the project's root.
2.2. Next, create a Django secret key and save it your .env file as follows.
# tools/quickstart.py
from django.utils.crypto import get_random_string

# Generate a secret key for your project.
chars = 'abcdefghijklmnopqrstuvwxyz0123456789!@#$%^&*(-_=+)'
generated_secret_key = get_random_string(50, chars)
print(generated_secret_key)
# .env
SECRET_KEY=xyz
2.3 Next, add a Firebase web app. We recommend using the same namespace you chose for your project, for example your-lims, and setting up [Firebase Hosting] with your app. Once you have created a web app, navigate to your Firebase project settings, find your Firebase app Config, and set your Firebase configuration in your .env file.
# .env
FIREBASE_API_KEY=xyz
FIREBASE_AUTH_DOMAIN=your-lims.firebaseapp.com
FIREBASE_DATABASE_URL=https://your-lims.firebaseio.com
FIREBASE_PROJECT_ID=your-lims
FIREBASE_STORAGE_BUCKET=your-lims.appspot.com
FIREBASE_MESSAGING_SENDER_ID=123
FIREBASE_APP_ID=123
FIREBASE_MEASUREMENT_ID=G-abc
2.4. If you wish to leverage Cannlytics' email capabilities, then set EMAIL_HOST_USER and EMAIL_HOST_PASSWORD environment variables in your .env file. It is recommended that you create an app password if you are using Gmail.
# .env
EMAIL_HOST_USER=admin@your-company.com
EMAIL_HOST_PASSWORD=your-app-password
2.5. Finally, to facilitate communication between your app and Firebase, create and download a service account and save the path to your service account as a GOOGLE_APPLICATION_CREDENTIALS environment variable. For your security, this configuration file needs to be kept in a safe place.
# .env
GOOGLE_APPLICATION_CREDENTIALS=path/to/your/service/account.json
You will need to grant your service key Secret Manager Admin permissions in Cloud IAM Admin.
2.6. Finish by creating a .firebasesrc in the root directory with your [Firebase Hosting] references. For example
{
  "projects": {
    "default": "your-lims"
  },
  "targets": {
    "your-project": {
      "hosting": {
        "docs": [
          "your-lims-docs"
        ],
        "dev": [
          "your-lims-dev"
        ],
        "production": [
          "your-lims"
        ]
      }
    }
  }
}
For downloading files from Firebase Storage, you should set your CORS rules. If you don't want any domain-based restrictions (the most common scenario), then copy the following JSON to a file named cors.json:
[
  {
    "origin": ["*"],
    "method": ["GET"],
    "maxAgeSeconds": 3600
  }
]
Then deploy the rules with:
gsutil cors set cors.json gs://<your-cloud-storage-bucket>
Note: Your service account will need
gcloud.builds.submitandstorage.objects.getpermissions to deploy the rules.
2.7 Create your production secret environment variables
Now, you will need to set your environment variables for production.
Open Google Cloud Shell and run the following command to ensure that you are working under the correct email and with the correct project:
gcloud init
Next, ensure that your project has billing enabled, then enable the Cloud APIs that are used:
gcloud services enable \
  run.googleapis.com \
  sql-component.googleapis.com \
  sqladmin.googleapis.com \
  compute.googleapis.com \
  cloudbuild.googleapis.com \
  secretmanager.googleapis.com
Create a secret with:
gcloud secrets create \
  cannlytics_lims_settings \
  --replication-policy automatic
Allow Cloud Run access to access this secret:
PROJECT_ID=$(gcloud config get-value project)
PROJECTNUM=$(gcloud projects describe ${PROJECT_ID} --format 'value(projectNumber)')
CLOUDRUN=${PROJECTNUM}-compute@developer.gserviceaccount.com

gcloud secrets add-iam-policy-binding \
  cannlytics_settings \
  --member serviceAccount:${CLOUDRUN} \
  --role roles/secretmanager.secretAccessor
Cloud Build will run Django commands, so Cloud Build will also need access to this secret:
PROJECT_ID=$(gcloud config get-value project)
PROJECTNUM=$(gcloud projects describe ${PROJECT_ID} --format 'value(projectNumber)')
CLOUDBUILD=${PROJECTNUM}@cloudbuild.gserviceaccount.com

gcloud secrets add-iam-policy-binding \
  cannlytics_settings \
  --member serviceAccount:${CLOUDBUILD} \
  --role roles/secretmanager.secretAccessor
Create a Cloud Storage bucket with a globally unique name:
REGION=us-central1
GS_BUCKET_NAME=${PROJECT_ID}-media
gsutil mb -l ${REGION} gs://${GS_BUCKET_NAME}
Then create your environment variables and save them to the secret:
APP_ID=cannlytics
REGION=us-central1
DJPASS="$(cat /dev/urandom | LC_ALL=C tr -dc 'a-zA-Z0-9' | fold -w 30 | head -n 1)"
echo DATABASE_URL=\"postgres://djuser:${DJPASS}@//cloudsql/${APP_ID}:${REGION}:cannlytics-sql/cannlytics-sql-database\" > .env
echo GS_BUCKET_NAME=\"${GS_BUCKET_NAME}\" >> .env
echo SECRET_KEY=\"$(cat /dev/urandom | LC_ALL=C tr -dc 'a-zA-Z0-9' | fold -w 50 | head -n 1)\" >> .env
echo DEBUG=\"False\" >> .env
echo EMAIL_HOST_USER=\"your-email\" >> .env
echo EMAIL_HOST_PASSWORD=\"your-email-password\" >> .env
gcloud secrets versions add cannlytics_settings --data-file .env
rm .env
Set
EMAIL_HOST_USERandEMAIL_HOST_PASSWORDwith your email and app password. If you do not plan to use Django's email interface, then you excludeEMAIL_HOST_USERandEMAIL_HOST_PASSWORD.
Update your IAM policy:
gcloud beta run services add-iam-policy-binding --region=us-central1 --member=allUsers --role=roles/run.invoker your-lims
You can confirm that the secret was created or updated with:
gcloud secrets versions list cannlytics_settings
3. Installing project dependencies and development tools
Cannlytics is built and depends on the following software and services, so you will need to install or setup each service. We recommend using the latest stable version of each piece of software whenever possible.
- Python
- Django
- Docker
- Firebase
- Firebase Tools
- Google Cloud Platform
- Google Cloud SDK
- Node.js
- Javascript, HTML, CSS
- Gimp
- Inkscape
Architecture
Cannlytics is built with Python and leverages the Django framework. Cannlytics utilizes Firebase for user authentication with Firebase Authentication, a Firestore NoSQL database for real-time data management, Firebase Storage for file storage, and hosted with Firebase Hosting. Cannlytics uses a number of Google Cloud backend services, including:
- Cloud Build to containerize the app.
- Cloud Registry to upload the app to storage.
- Cloud Run to run the app as a stateless container.
- Cloud Storage for file storage.
- Cloud Secret Manager for storing configurations and keeping secrets secret.
Cannlytics generally follows a model-template-view (MTV) architectural pattern, where:
- The model is Django, the engine that sends requests to views.
- The views are Python functions that describe the data to be presented.
- The templates are Django HTML files that describe how the data is presented.
Cannlytics favors a domain-style code structure for apps and material that will be edited frequently and a ducks-style code structure for concepts within the apps. Ducks 🦆 can inherit properties if needed and are encouraged to be individualized and self-contained as possible. The architecture of the Cannlytics app is as follows.
├── .admin
│   └── tokens
│       └── your-firebase-service-account.json
├── .firebase
│   ├── firestore.indexes # Available database queries.
│   ├── firestore.rules # Database access control and data validation.
|   └── storage.rules # File storage access control and validation.
├── api
│   ├── {endpoint}
│   |   └── {endpoint}.py # Implementation of specific API endpoints.
│   ├── urls.py # Defined API endpoints.
|   └── views.py # Implementation of general API endpoints.
├── cannlytics
│   ├── lims # All LIMS logic.
│   ├── traceability
│   |   ├── leaf # Leaf Data Systems API module.
|   |   └── metrc # Metrc API module.
│   ├── utils # General utility functions.
│   ├── firebase.py # Firebase module.
|   └── models.py # Main data entities.
├── console
│   ├── assets
│   |   ├── css # Core style, minified and bundled.
│   |   └── js # JavaScript bundled into a `cannlytics` module.
│   ├── core # Required Django configuration.
│   ├── static/console # Static files, like images.
│   ├── templates/console # User interface templates.
│   ├── settings.py # Django configuration.
│   ├── state.py # Static text for certain pages and sections.
│   ├── urls.py # Console navigation.
│   ├── utils.py # General console utility functions.
|   └── views.py # Implementation of user interfaces and their context.
├── docs
│   ├── src # The documentation text.
│   ├── theme # The style of the documentation.
|   └── Dockerfile # Documentation container configuration.
├── node_modules
├── public
|   └── static # Files hosted with Firebase hosting.
├── tests # Tests for all features and functionality.
├── tools # Development tools.
├── website # A company website.
├── .env # Your secrets.
├── .firebasesrc # Firebase hosting sources.
├── db.sqlite3 # Unused SQL database.
├── Dockerfile # Docker container configuration.
├── firebase.json # Firebase configuration file.
├── LICENSE
├── manage.py # Django utility script.
├── mkdocs.yaml # Documentation configuration.
├── package.json # Node.js dependencies and scripts.
├── README.md
├── requirements.txt # Python requirements.
└── webpack.config.js # JavaScript and CSS bundle configuration.
Development
Development can happen in many avenues. Frequent, small scope pull requests are encouraged. Any contribution, even if it needs future polishing, helps build the project and advance the field of cannabis analytics. In general;
- Create a fork of the repository.
- Work on a solution for your most-pressing problem.
- Create a pull request for your changes to be reviewed and merged into the project upon approval or for you to receive feedback on how your changes can be approved.
The simplest way to run the app is to open a command line from the project's root directory and run:
python manage.py runserver
You can also leverage django-livereload-server for hot-reloading while you develop.
npm run start
Authentication
Below is a diagram that depicts how Cannlytics leverages [Firebase Authentication] to authorize user requests.
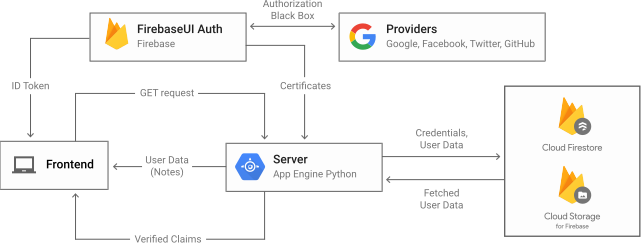
Original image: How to authenticate users on Google App Engine using Firebase
Running the project for development
Hot-reloading is an important tool of development. You can use django-livereload-server, which uses both python-livereload and django-livereload, for smooth reloading. You can install django-live-reload-server with:
pip install django-livereload-server
You can start hot-reloading by starting the livereload server:
python manage.py livereload
In another console, you start the Django development server as usual:
python manage.py runserver
You can build the static assets, JavaScript and CSS, utilizing Webpack. The JavaScript bundle is a JavaScript module and is callable from the user interface with the cannlytics namespace. You can run the build for development with:
webpack-dev-server --env production=False
or
npm run webpack
It is an inconvenience to run multiple consoles, but a major convenience to have smooth hot-reloading. So, npm-run-all is used to run multiple servers in the same console for smooth development. When you are setup, you can run the project for development simply with:
npm run start
Data
Cannlytics operates with a NoSQL database, Firestore by default. You can conceptualize every entity as a JSON object called a document. A group of documents is a collection. Every document is required to be a member of a collection. Below is a diagram of the Cannlytics LIMS standard data models.

File Storage
Cannlytics utilizes [Firebase Storage] ( a.k.a Google Cloud Storage) for most storage solutions. For help with storing static files, see serving static files on App Engine. You can gather all supporting files, located in each app's static directory, into the public/static directory with:
python manage.py collectstatic --noinput
or
npm run collectstatic
You can configure static files to be served from [Firebase Storage] instead of from [Firebase Hosting] in console/settings.py.
If you are sending email with Gmail, then you can follow these steps.
- Navigate to Gmail, click your profile, and click manage your google account.
- Navigate to the security tab.
- Enable 2-step verification and then click on App passwords.
- Select Mail for app and enter a custom name for device.
- Click generate and Gmail will generate an app password. Copy this app password to a text file and save it where it is secure and will not be uploaded to a public repository, for example save the password in the
.admindirectory.
After you have created your app password, set your Gmail email and app password as environment variables, EMAIL_HOST_USER and EMAIL_HOST_PASSWORD respectively.
echo EMAIL_HOST_USER=\"youremail@gmail.com\" >> .env
echo EMAIL_HOST_PASSWORD=\"your-app-password\" >> .env
gcloud secrets versions add cannlytics_settings --data-file .env
Views
Views are Python functions that describe the data to be presented. Django describes views in the following quote.
"Your view can read records from a database, or not. It can use a template system such as Django's – or a third-party Python template system – or not. It can generate a PDF file, output XML, create a ZIP file on the fly, anything you want, using whatever Python libraries you want."
Templates
Templates are Django HTML files that describe how the data is presented. Default Django templates can be found in your Anaconda/Python directory in Lib\site-packages\django\contrib\admin\templates\admin.
Style
Style distinguishes one site from another. You are free and encouraged to modify the style to create a site that is uniquely yours. Bootstrap is used for styling templates. You can install Bootstrap with:
npm install bootstrap
npm install style-loader --save
The main Cannlytics colors are:
- Cannlytics Orange: #ff5733
- Cannlytics Light Orange: #ffa600
- Cannlytics Dark Orange: #e53a23
- Cannlytics Green: #45B649
- Cannlytics Light Green: #96e6a1
- Cannlytics Dark Green: #3f7f34
- Cannlytics Darkest Green: #104607
The main Cannlytics fonts are:
Useful open source icon sets include:
Text Material
All text material is either stored in JSON in state.py or written in Markdown in docs directories.
Resources:
Building and running the project with Docker
You can build the application in a Docker container image with:
# build docker image
docker build -t cannlytics .
You can register the container with:
# docker push to container registry.
docker push cannlytics
You can run the application container locally with:
# run docker
docker run -dp 8080:8080 --env-file docker.env cannlytics
Finally, you can quickly run the container, or multiple containers, with:
# bring up containers
docker-compose up -d --build

# bring down
docker-compose down

# logs
docker-compose logs
Documentation
Documentation for the project is written in Markdown. Building the documentation locally requires installing Material for MkDocs and Docker. The configuration for the documentation is contained within mkdocs.yml. You can serve the documentation locally by first pulling and building the Material for MKDocs image:
docker pull squidfunk/mkdocs-material
docker build -t squidfunk/mkdocs-material docs
Once setup, you can preview the documentation as you write:
docker run --rm -it -p 8000:8000 -v "%cd%":/docs squidfunk/mkdocs-material
or
npm run docs
Note that there is a namespace conflict between
django-livereload-serverandlivereload, so you need to be careful when and where you install Python requirements. If you run into adjango-livereload-serverimport error, first check thatPRODUCTION = Falsein yourconsole/settings.pyand then follow these instructions to uninstalllivereloadand reinstalldjango-livereload-server.
When you are ready, you can build the documentation:
npm run build-docs
And publish the documentation:
npm run publish-docs
Testing
You can check for errors detectable by Django with:
python manage.py check
You can run tests for a specific app with.
python manage.py test your_app_name
You can also build the platform in a docker container for your specific purposes:
docker build . --tag gcr.io/your-lims/cannlytics
gcloud auth configure-docker
docker push gcr.io/your-lims/cannlytics
Publishing
See the publishing guide for complete instructions on how to publish Cannlytics for production. The guide is based on the Running Django on Cloud Run guide. After setup, publishing is done with one command:
npm run publish
If you need to change accounts or projects, then you can use:
gcloud config set account `ACCOUNT`
gcloud config set project `PROJECT ID`
The build process contains three steps:
- Containerize the app and upload it to Container Registry.
Build your container image using Cloud Build by running the following command from the directory containing the Dockerfile:
gcloud builds submit --tag gcr.io/your-lims/cannlytics
- Deploy the container image to Cloud Run.
gcloud beta run deploy your-lims --image gcr.io/your-lims/cannlytics --region us-central1 --allow-unauthenticated --service-account=${GCS_SA}
- Direct hosting requests to the containerized app.
This step provides access to this containerized app from a [Firebase Hosting] URL, so the app can generate dynamic content for the Firebase-hosted site.
firebase deploy --only hosting:production
Note: You can setup a custom domain. You can register a domain with Google Domains. You can then add a custom domain in the Firebase Hosting console. If you are using Google Domains, then use '@' for your root domain name and 'www' or 'www.domain.com' for your subdomains when registering your DNS A records.
Security rules
You can deploy a new set of security rules with the Firebase CLI.
firebase deploy --only firestore:rules
Monitoring
You can now monitor your app with the following tools.
| Resource | Description |
|---|---|
| Cloud Run Console | Manage your app's container. |
| Logs Explorer | Realtime logs for your app. |
| Error Reporting | Provides detailed historic errors that occurred when running your app. |
Conclusion
Congratulations, you have developed, built, and published Cannlytics! You now have a simple, yet complex, website running on Cloud Run, which will automatically scale to handle your website's traffic, optimizing CPU and memory so that your website runs with the smallest footprint possible, saving you money. If you desire, you can now seamlessly integrate services such as Cloud Storage into your Django website. You can now plug and play and tinker to your heart's content while your users enjoy your well-organized cannabis data and analytics!